oak cabinets before painting
Will oak cabinets show grain when they are painted?

That is a loaded question! I assume you are asking because you have oak cabinets that you are looking to get painted. We are asked this question every time people call us about painting oak cabinets.

Hey Everyone- David with Dfranco Painting and Wallpaper in Huntly, IL. This year’s top on line Question is..Will oak cabinets show grain when they are painted? Yes and no. The answer really should be it depends. So if you are in the Chicagoland Suburbs such as Elgin, Crystal Lake, Pingree Grove, St. Charles, or Bartlett, the oak cabinets are pretty similar. The process and finish will be very similar so-Let’s get into it.

Why do I see the grain on oak doors?

Oak as a wood species is considered a very hard and durable wood. It is used in many different areas such as:

  • doors
  • cabinets
  • toys
  • floors
  • furniture
  • pallets
  • wainscoting

Oak has a very definitive grain pattern. I would call it an open grain pattern as you can see the light and dark variations of the wood color throughout the wood. These different grain variations also create a less than uniform appearance. Compared to maple cabinet painting you see very little grain patterns and it is very smooth. This graining is great when you are staining the wood as it looks great and you know you have wood. Some woods are so dense they have a hard time taking stain, or have nothing special about them and would be better off painted.

Can I get rid of grain in my oak doors of they are painted?

Now we are getting into the meat of this one! When we are painting oak doors, we have to ask what is your expectations.

painting oak cabinets - how to paint oak cabinets white without grain showing
here is an oak door that we have applied primed and then sanded smooth

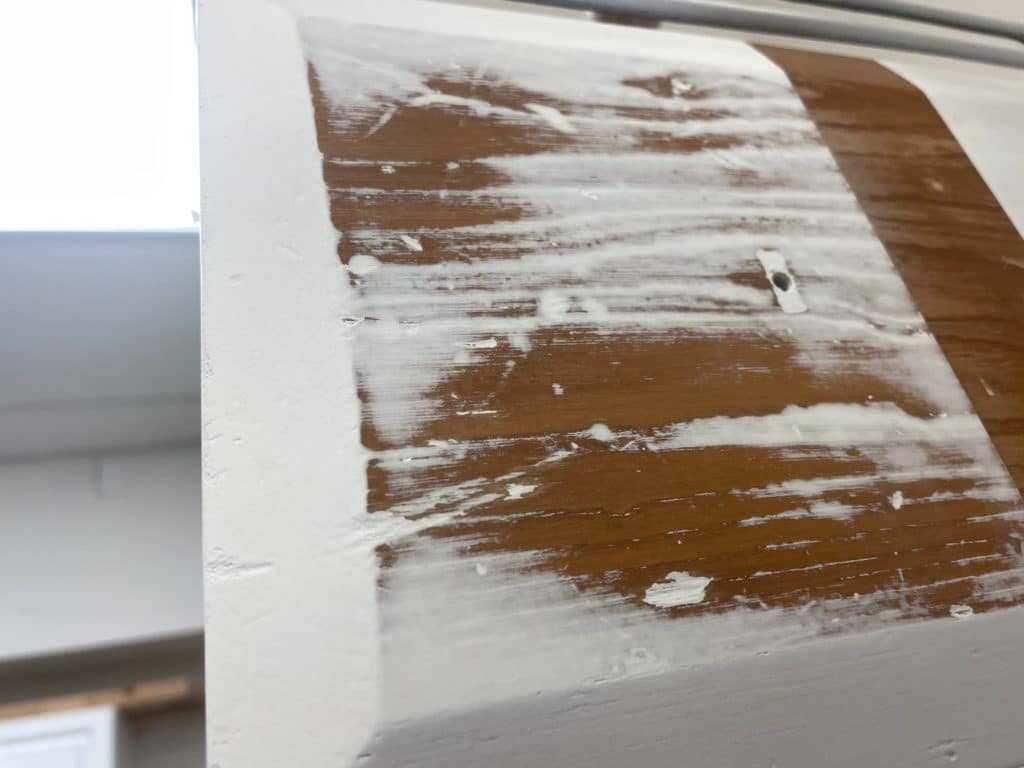
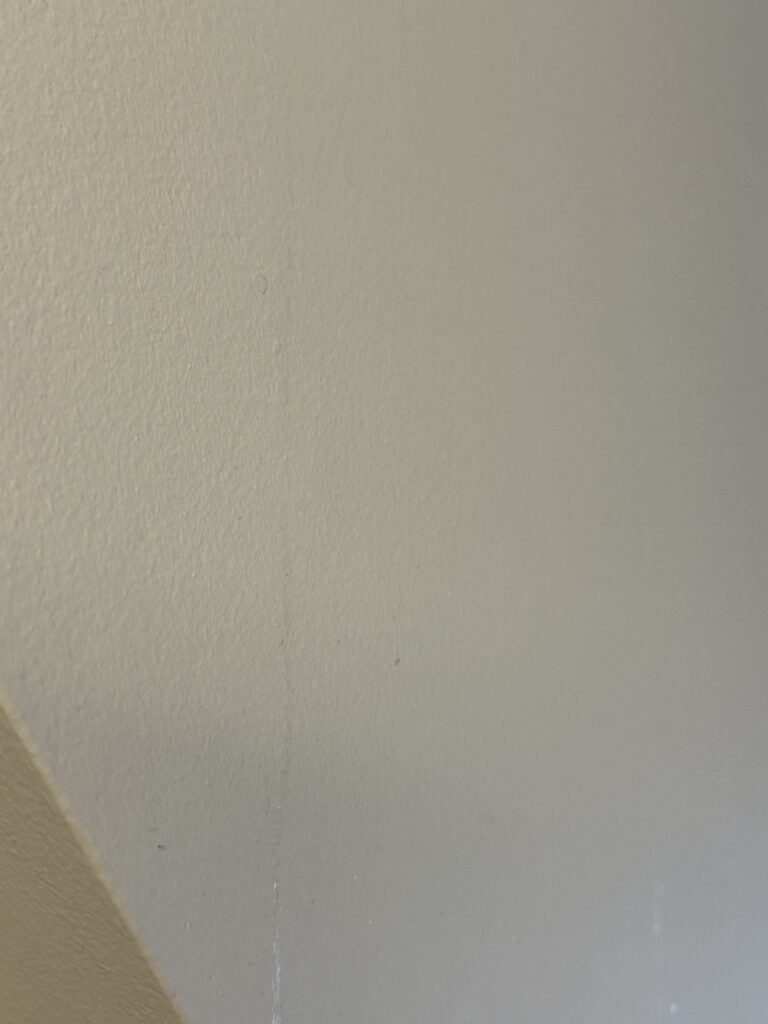
As you can see with the image, the oak grain really shows through after we have sanded this door. We have deliberately made this happen. When we are painting oak cabinet doors, we roll on the primer a bit diluted so it will penetrate into the pores and grains of the wood. After it has dried we power sand it smooth and the oak will be revealed while the veins of the wood stay white.

painting oak cabinets white
here is a oak door that has been sanded and now has its second coat of primer

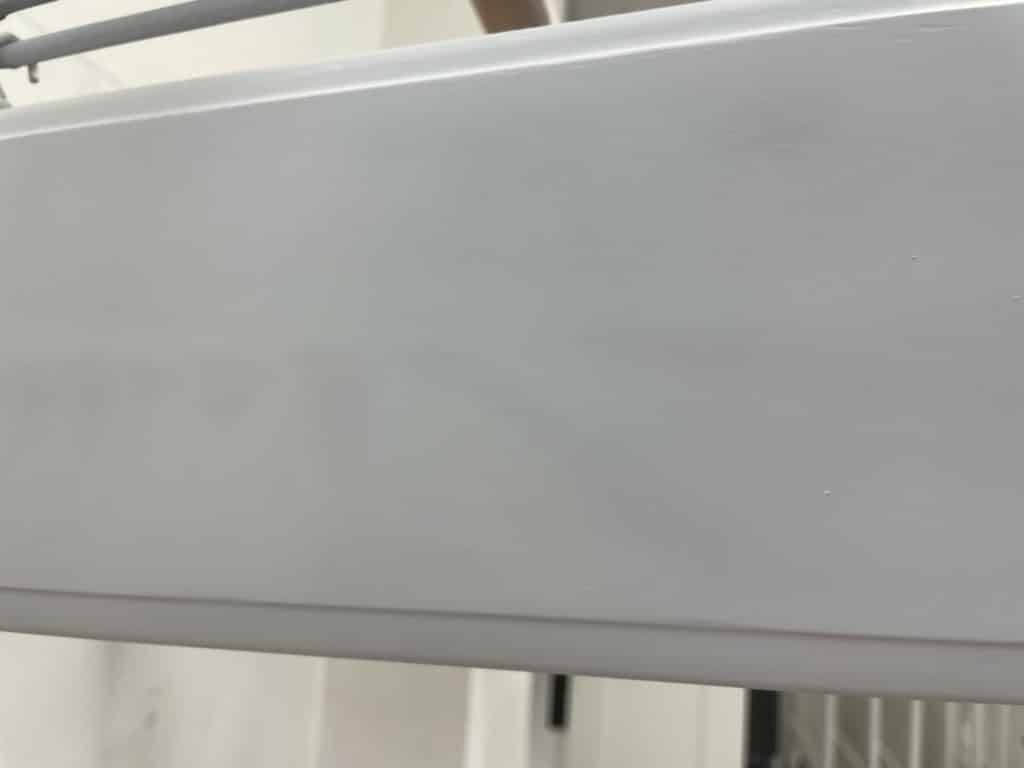
With the door now having its second coat of primer applied, you can kind of still see the oak wood grain come through. This is happening for a few reasons. First, when we sanded the last time we sanded pretty hard and it released the wood tannin which stains the wood. Second, the wood itself has a lot of texture, and that texture takes a few coats of primer to get rid of!

how to paint oak cabinets without the grain showing
an oak cabinet door with 3 coats of primer to almost eliminate the grain

Right about now I can hear someone asking “this is great but will oak cabinets show grain when they are painted?”

Removing oak grain from kitchen cabinets before painting them white

How to get rid of the oak grain when painting kitchen cabinets

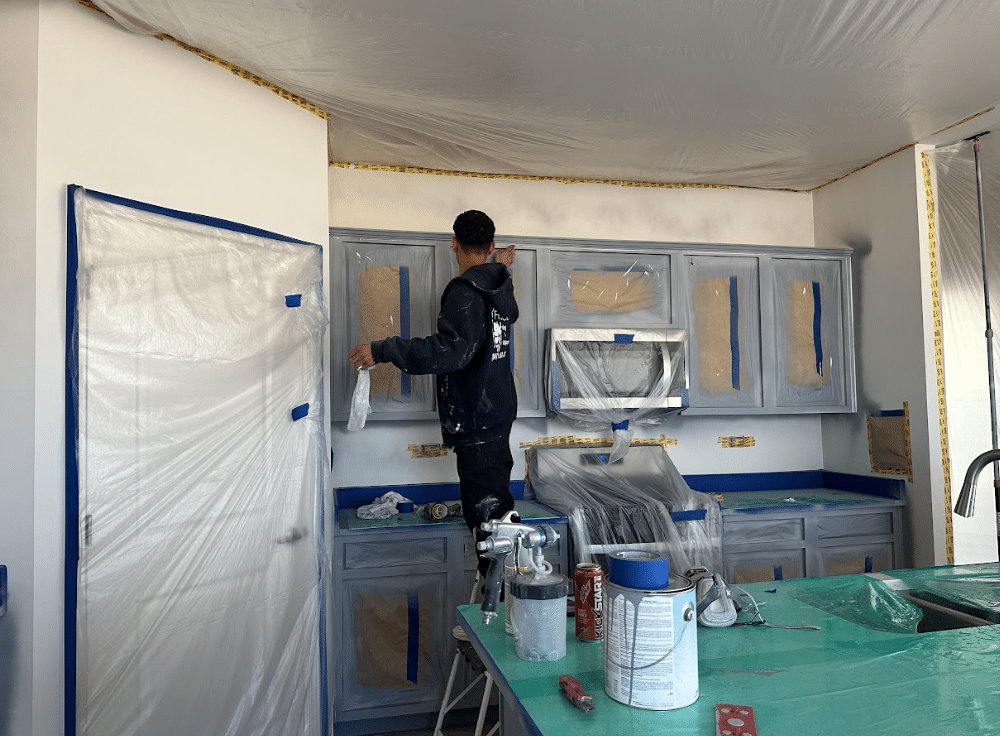
I kind of let the cat out of the bag above on this but here is our step-by-step process for prep and getting rid of grain in oak cabinet doors. (this assuming the doors are removed)

  • Once back to our shop we are cleaning the doors before we do anything.
  • Wearing rubber gloves, begin to spray cleaner to the doors to remove dirt, grime, etc.
  • Once clean, we will wet sand the doors with a degreaser to get any residue off the doors.
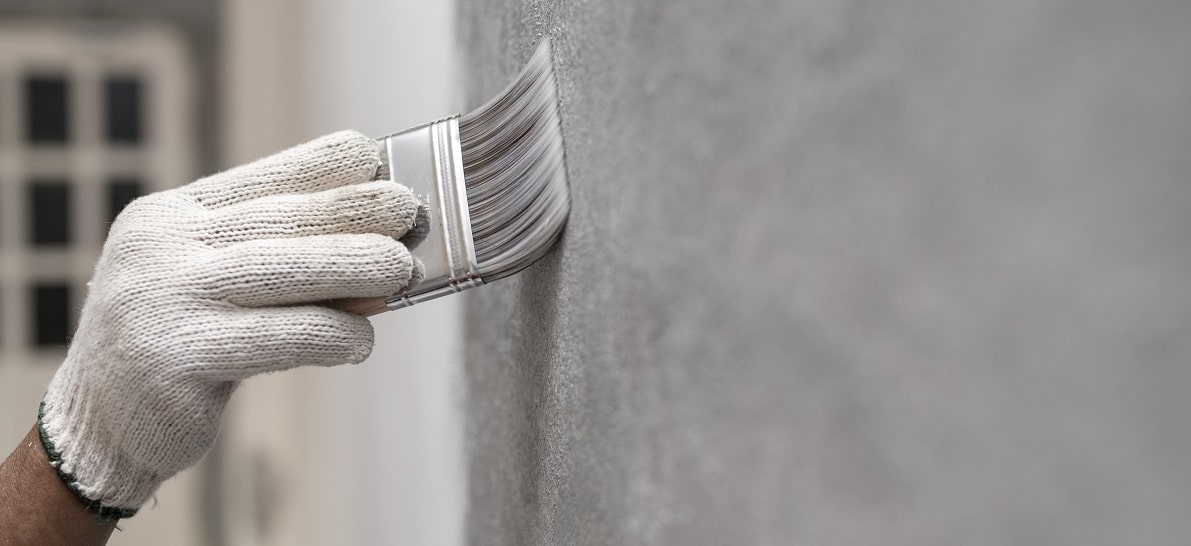
  • After the doors are dry, we will apply the first coat of bonding primer with a roller.
  • When the primer is dry, sand the door smooth.
  • Apply a second coat of primer and allow to dry.
  • Get the sander out again and sand smooth.
  • At this point we inspect. Some oak doors only need two coats, apply third if needed.
  • Now oil prime to seal out stain and wood tannin.
  • Allow to dry and start to paint!

Oak cabinets painted white with grain showing through

Believe it or not, there are some people that like the grain showing through the wood so they know it is a real wood door. We have never been asked to do that. We have reduced it, but never gone so far as to have someone want their oak cabinets to look like a white stain.

There is a really cool technique called ceruse. We have played with it but it has never really gone any further than that (for us).

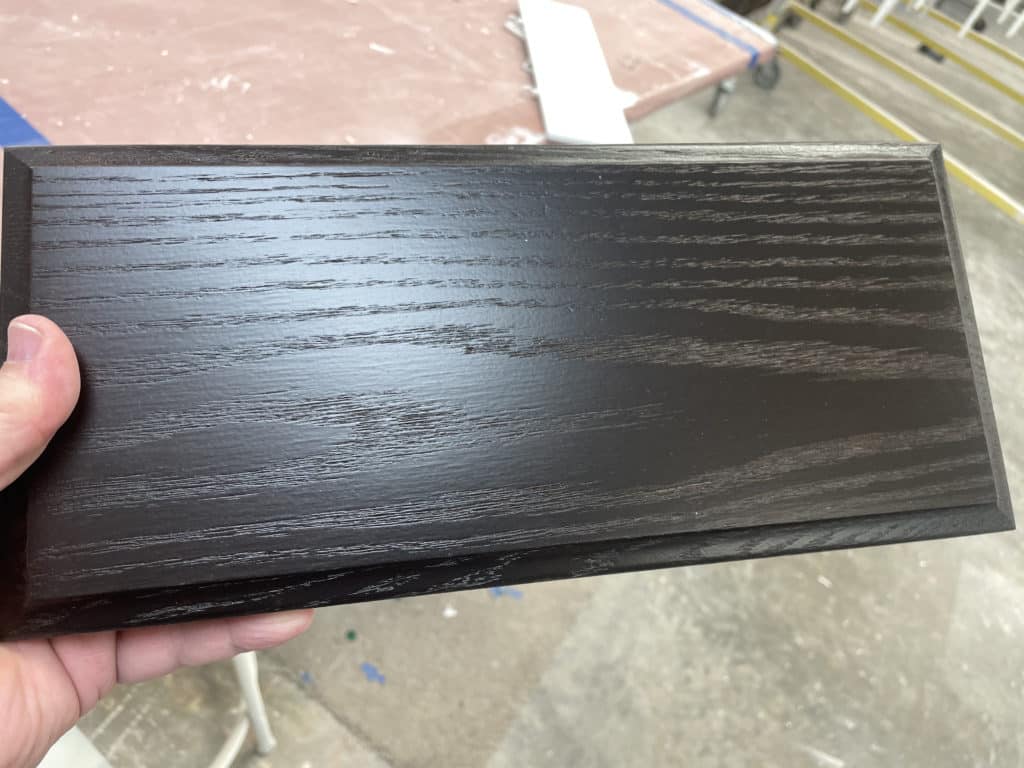
So one thing we have done is clean, sand and apply a tinted clear urethane to make the doors look as though they were stained a darker color. If you do go this route, it is a much simpler process and quicker too!!

oak cabinet door sprayed with a dark tinted urethane
An oak cabinet door sprayed with a dark tinted clear urethane

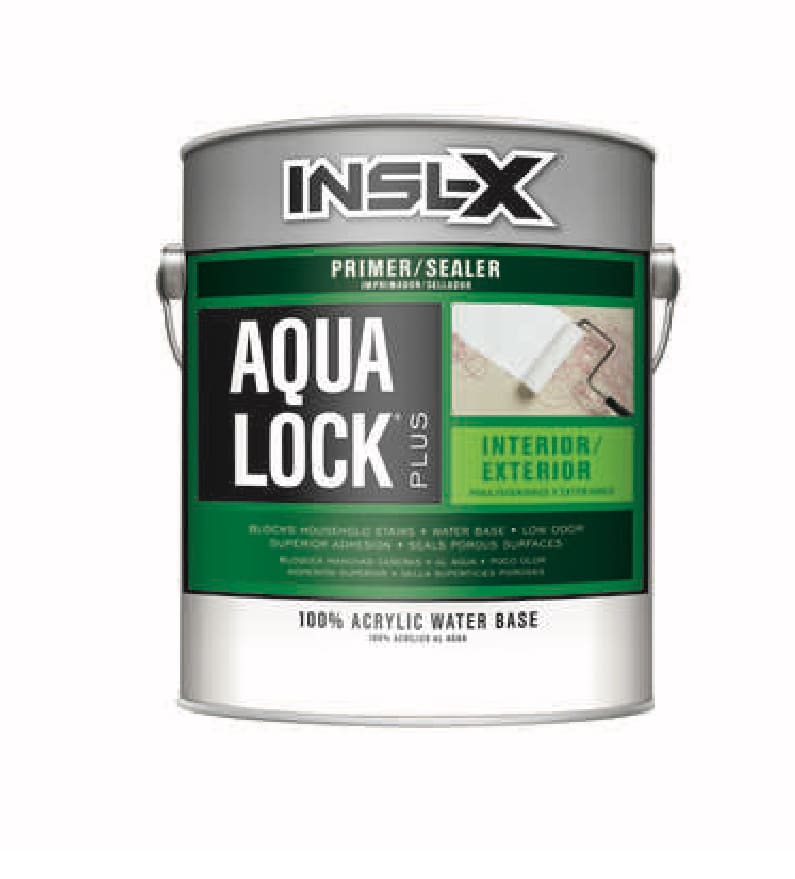
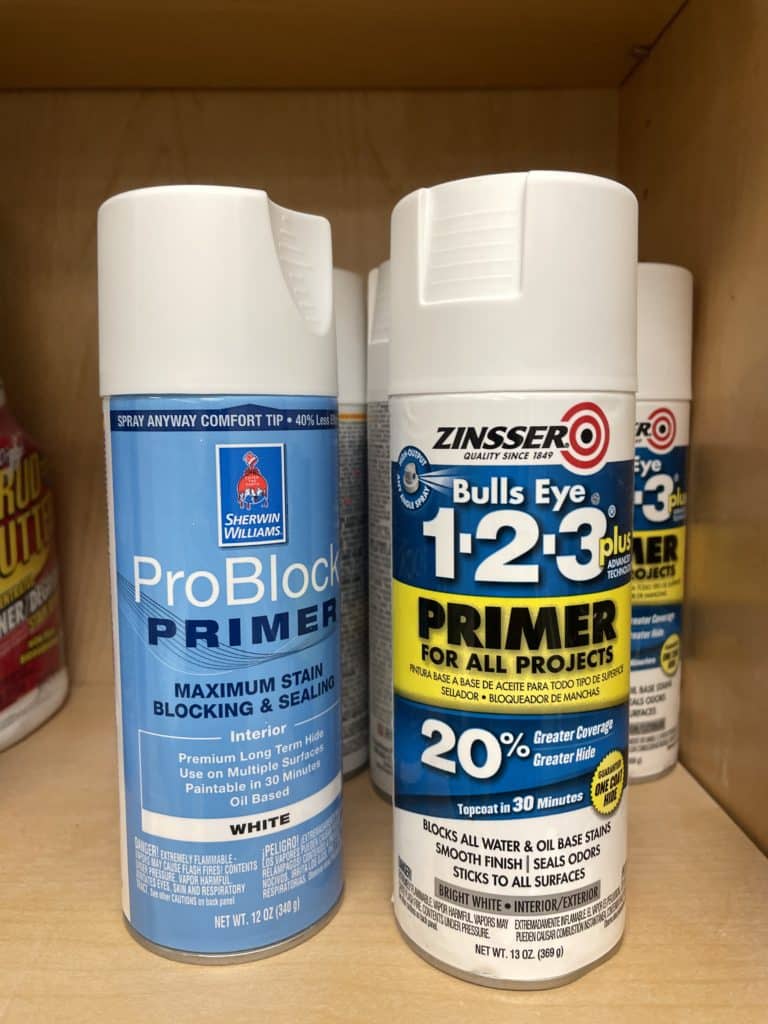
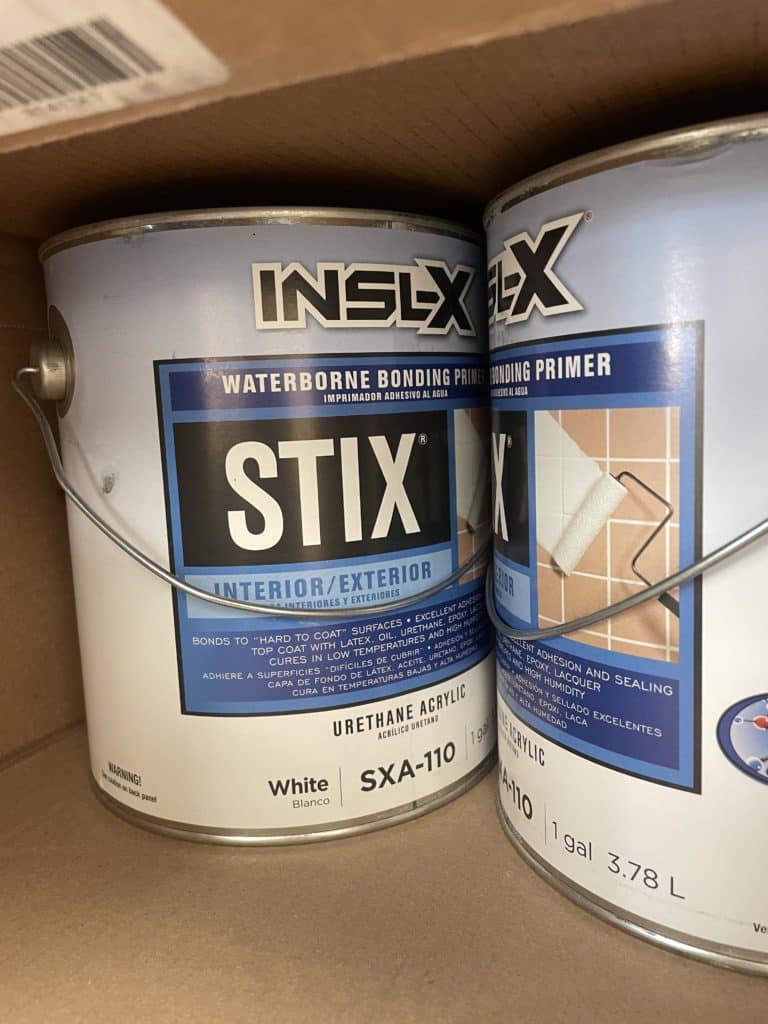
Best primers to use when painting oak cabients

Every primer has a purpose. While there are actual grain fillers you can buy and apply to the doors, we have found it isn’t worth the money and they are a real pain to sand smooth.

So we use primer. It is cheap. They dry fast. All of them are easy to sand smooth and we don’t have a lot of dust to worry about.

best primers to use when painting oak cabinets
spray spot primer
insul-x primer - oak cabinet painting
bonding primer
oil based stain
oil stain blocking primer

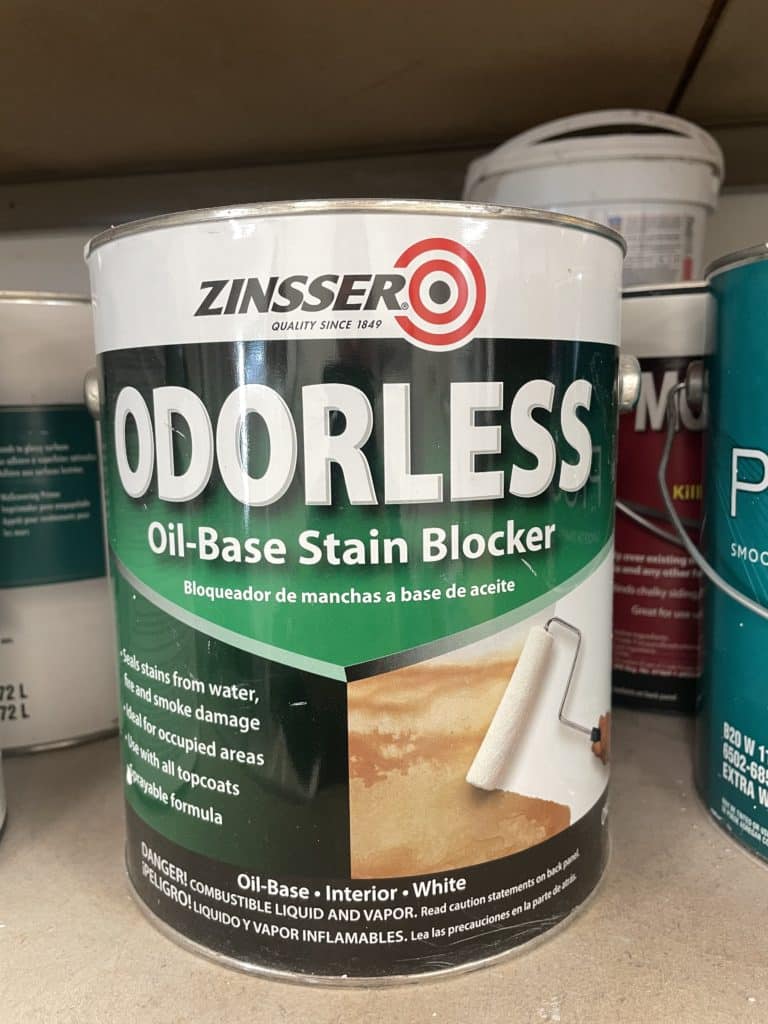
Those are the top three primers we use. For large cedar, pine and oak projects the oil odorless is the ticket. We never have to worry about any stains once we prime. We also have used this on oak cabinet projects where heavy cooking oils and hair care products were used.

Stix is just a great bonding primer. Stix it and forget it.

The spot primers are for touch ups. Sometimes the doors or cabinets have a stain that is stubborn and want to keep saying hello.

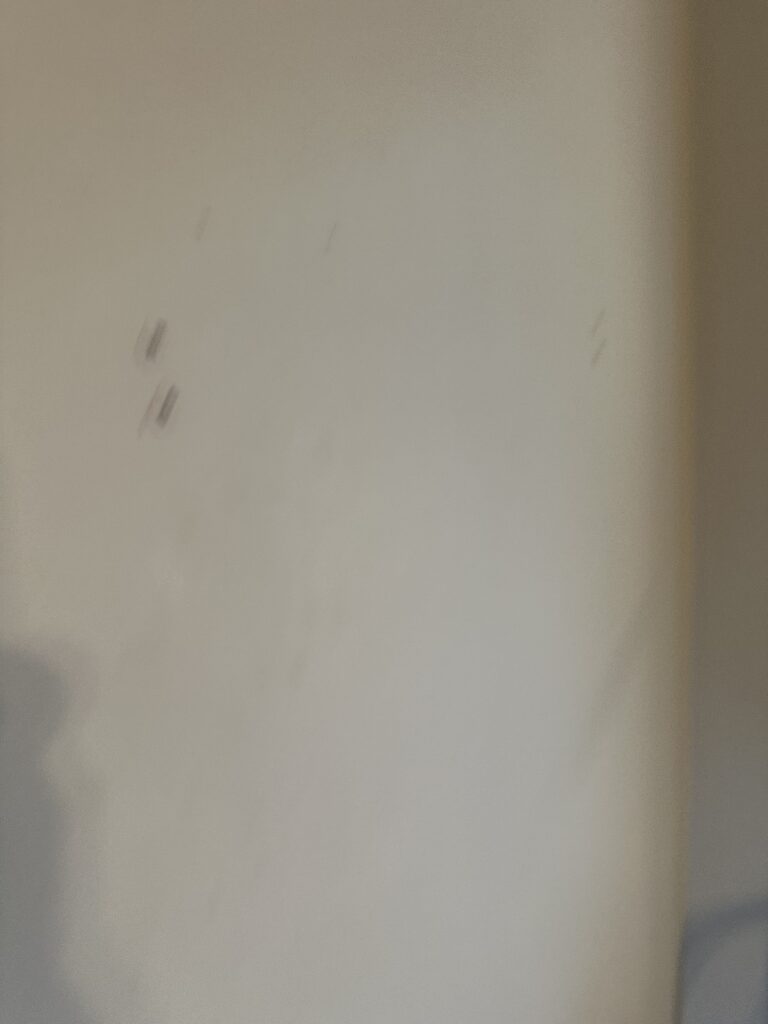
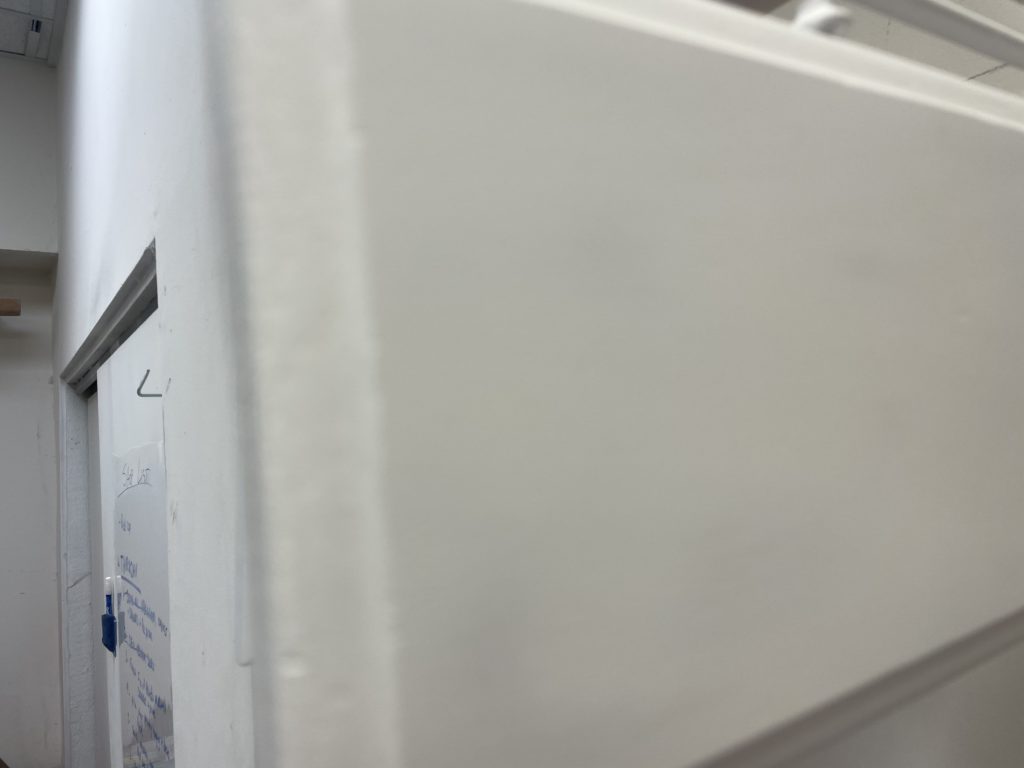
Oak cabinet door with no grain painted white

painting oak cabinets without the grain showing
a oak cabinet painted white with no grain

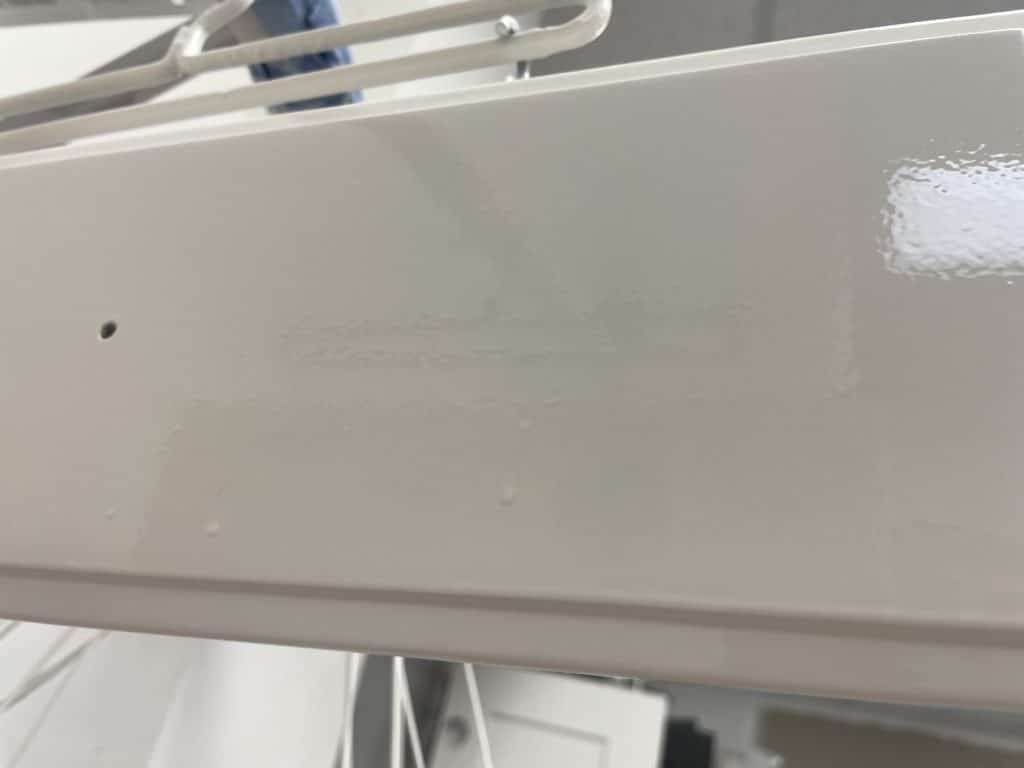
This is a drawer front we just painted, so it is shiny because it is wet. But compared to the first few images, the grain is pretty much gone.

The fun part of this project is you can have fun! Pick the color you want, it doesn’t matter. You can select how much grain you want or don’t want.

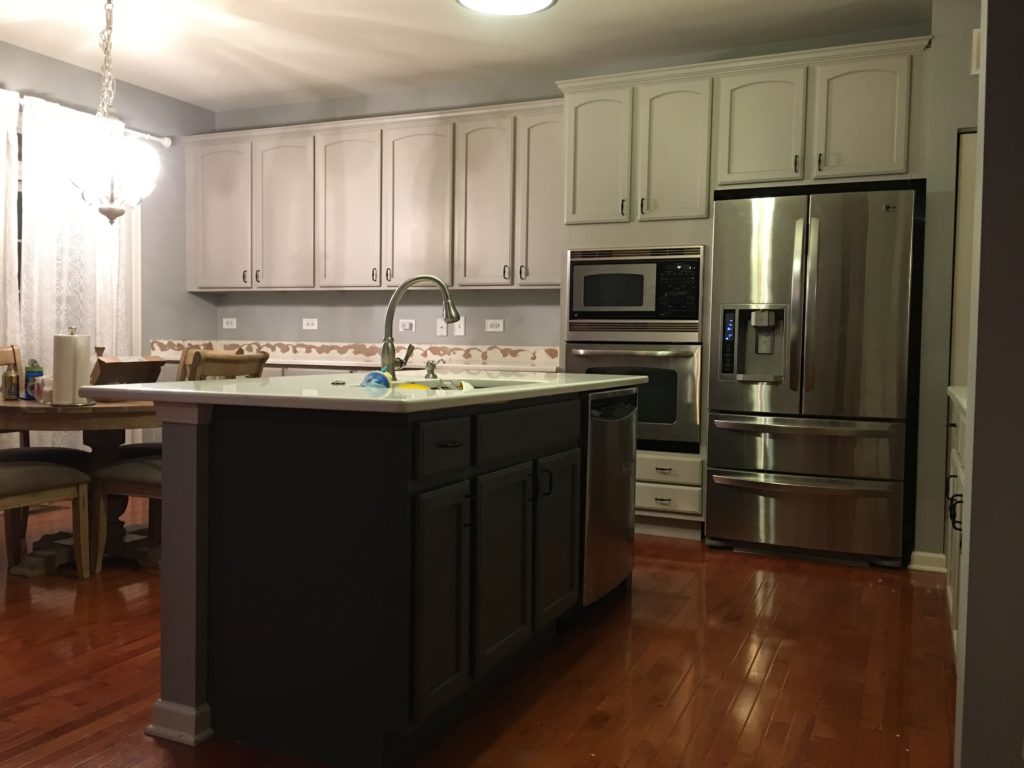
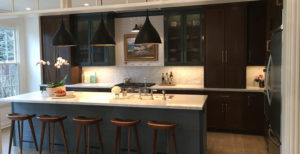
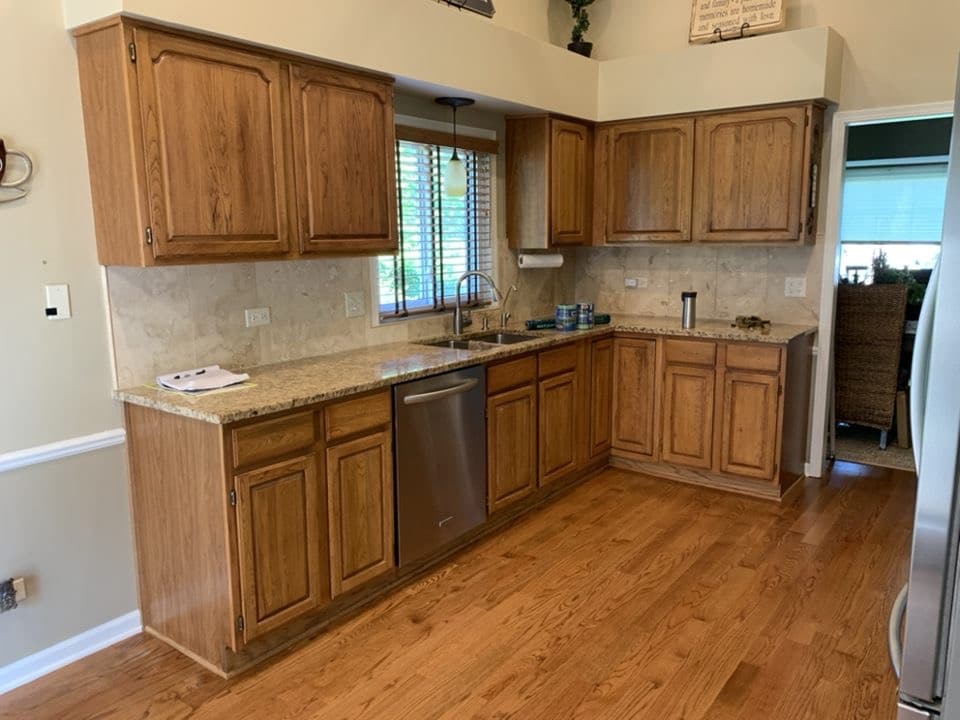
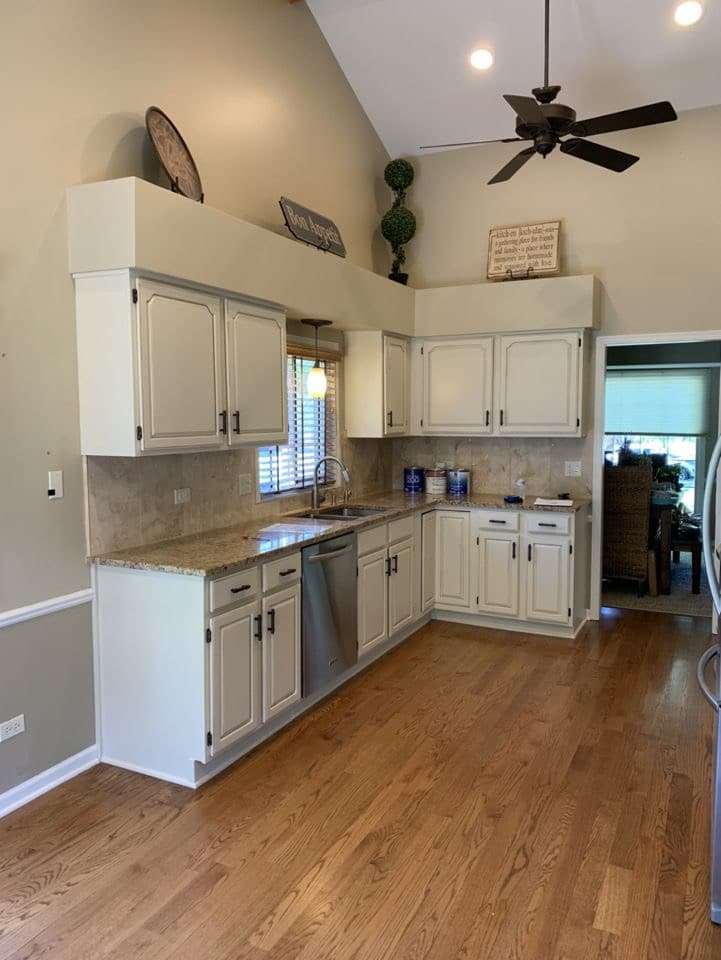
Painted Oak Kitchen Cabinets Before and After

before and after painting oak cabinets
oak cabinets before they were painted
painting oak cabinets white - after cabinet painting
oak cabinets painted white

So…will oak cabinets show grain when they are painted? You decide. You can show the grain if you want to, but then again they are your cabinets, do what you want!

If you are looking to have your oak cabinets painted or have any questions about cabinet painting, let us know how we can help!

virtual estimates
Painting Cherry Cabinets Elgin

So.. your home has cherry cabinets. You are ready for a new look and feel to your kitchen. Replacing cabinets is not in your budget. The next best option is too paint your cabinets! So if you are considering Painting Cherry Cabinets Elgin or the surrounding suburbs, this post is for you!

Hello Everyone, I am David with Dfranco Painting and Wallpaper in Huntley, IL. The top question and query we recieved over the past month has been regarding painting Cherry cabinets, so I thought I would revisit this topic for you.

Are you ready to paint your Cherry Cabinets?

If you are like many of our customers in the Chicagoland area, such as South Elgin, Hampshire, or Crystal Lake, you have a home that has these cherry cabinets. You been looking at Pinterest, Google images, watching HGTV or YouTube videos about painting kitchen cabinets. You are tired of how they look and make your kitchen so dark. Many of our family members, friend and other customers have this same question- so you are in the right place. Now we’ll answer the question- Should I paint my cherry cabinets?

before cabinet painting - should i paint my cherry cabinets
Do you have this type pf cherry cabinet kitchen?
painting cherry cabinets white
But you are ready for an updated kitchen like this?

How much will it cost to paint my cabinets?

The top two questions most people are asking when facing the question or problem of kitchen remodeling, is how much will it cost and will it last. For most people, it is the same answer.

  • The cost is based on how many cabinets you have
  • check our our pricing page!
  • The process is proven to last- so we give you a lifetime warranty on our work
  • We even come back in 1 year to do a check up if you need it

A common question- how much does it cost to paint cabinets? Right now, you can expect about $135.00 per cabinet to have it painted. That is an average so you can do some rough math by counting your cabinets. With the savings of painting your cabinets, you can replace your handles, get new soft close hinges, update your countertops, and change your sink and faucet!

Cherry cabinets before being painted white
Cherry cabinets after being painted and glazed

The best part about painting your cabinets is YOU decide what color you want! You can go to any JC Licht Store, or Sherwin Williams store in the Chicagoland area, pick any color you want- you can even pick two colors if you wish!!  (If you select the whites from BEHR- we may not be able to match it 100%)

Larger jobs may come with a free color consult!

So, can I paint MY cherry cabinets?

Before the details of how we paint your cabinets, there are several questions you have to be able to honestly answer to know if painting your cherry cabinets is a good solution for you.

  • Is there anything wrong with the cabinets you have? Is there any damage? Are there any broken doors? Do they have water damage? If you are saying no to any of these then so far you are on your way to painting your cherry cabinets!
  • Do you like the look of a painted cabinet? Some people, my father being one of them, cringes at the sound of painting wood. If you are not sure then take a few hours and go to a home improvement store like Home Depot or Menards to look and touch. Ask yourself if you can see yourself with painted kitchen cabinets.
  • If you are still feeling good about the idea then it is time for the next step!
before cherry cabinets painting
Original stained cherry cabinets
Painted cherry cabinets painted green

Things to Consider Before Painting Your Cherry Cabinets

There are a few things you need to be aware of if you have never had a kitchen or any cabinets that are painted. Painted cabinets are not like stained wood cabinets. I know you are here because you want to know about cherry cabinets, however, if your cabinets are pine-stained cherry color, this is not for you. Pine cabinets are not good candidates for paint. But you have solid Cherry! Stained cherry cabinets have a finish that has penetrated the wood fibers themselves to bond into the wood. Paint on a cabinet is given a bonding primer to stick to the surface of the cabinet. Then the paint is put on top of the primer. This is the same in a new factory cabinet or a refinished one like you are thinking about now.

Keep in mind, at the end of the day this is paint. It is a hard shell, it will resist stains, it will be washable, it will look impressive. Paint on wood can chip upon impact and wood doors will not allow you to place wet towels or rags on them and not become damaged.  I have to give you that bit of informaton up front so you know.

I have painted my cabinets in my home, people are doing it every day, and I believe it a great way to not just improve the look of your kitchen but change how you feel about the most important room in your home.

It Worked For These People, And It Will Work For You

Here is our latest google review about our cabinet painting!

Thanks to the Dfranco team for transforming our kitchen into a new and fresh look. Anthony’s attention to detail on the cabinets and doors was outstanding. Dave and Chad made sure that the job was done on a very timely basis. Thanks again to all of you.

Response from the owner16 hours ago

Hey John! Thank you for choosing Dfranco Painting and Wallpaper for your kitchen transformation project. We’re thrilled to hear that Anthony’s attention to detail stood out and that Dave and Chad ensured the job was completed in a timely manner. We appreciate your kind words and are glad you’re happy with the new and fresh look!

Video…

Here is a Video testimonial from a great customer in Elgin, IL about painting cherry cabinets:

cabinet painting video testimonial

What are you getting when you paint cherry cabinets?

When you hire D’franco Painting & Wallpaper, you’ll have the peace of mind of …

  • Having vetted workers of D’franco Painting & Wallpaper in your home that you can trust
  • We carry workman’s comp and liability insurance.
  • We have a system and process that has is used, always evaluated to improve and refine. And for over 15 years we still attend training annually to make sure we provide the best products for your home.
  • Lifetime Warranty on our work.
  • We use quality materials from Sherwin Williams and Benjamin Moore. Their time-tested and award-winning finishes will last and meet the demands of the most used room in your house.

It’s Decision Time

You have a choice to make: Keep looking at your cabinets and wonder what if…or worse, do nothing at all. You know where that will lead (to another web search on cherry cabinets, frustrated about the look and feel of your kitchen). Is that really where you want to go? Take a new action, and get a new result. Finally, get that estimate and transform your kitchen – Love the home you live in! Which do you really want for yourself? So here are your next steps: Call or text us

  • We will ask you for pictures of your kitchen
  • We will give you a cost to paint your cherry cabinets within $100-$200. It includes removing hardware, cleaning, painting the outside of the boxes and both sides of the doors. If the numbers look like you want more information we will make an appointment with you. We will come to your house with a door sample that you can touch and see. We will inspect everything and then give you an accurate quote of the exact cost
  • Receive a detailed description of how our process works and give you videos to show you of us in action.
  • You receive a list of products we use
  • You may qualify for a free color consult!
  • You’ll have a lifetime warranty.

So, you have asked the question “should I paint my cherry cabinets?”, and you have read the answers, now you are ready to take action and get a GET AN ESTIMATE today!

We look forward to helping you love the home you live in!

Here are some other blog articles on painting cabinets we have for you:

Paint Contractor Huntley, IL

If you are searching for a painter- you have landed in the right spot! know I have have used those same words for plumbers, electricians and septic contractors. Personally, I think D’franco Painting & Wallpaper is the best paint contractor in the Huntley area.  Here is a video that goes into one reason that we are different!

Is there a difference between painters?

As much as I hate to say this, the answer really is – It depends. Can there be that much of a difference? O Oh yes! . These are the top questions you should be asking:

  • Are you insured?
  • Do you use Subcontractors or have employees?
  • Do you have workman’s compensation?
  • How soon can you do our work?
  • What kind of paints do you use?
  • Do your crews speak English or can communicate clearly while the project is happening?
  • Have you done ____ before?
  • Does the company have any on line or Google Reviews?
  • Finally, how much will it cost?

It doesn’t matter if you are looking for a paint contractor in Crystal Lake, Geneva, Pingree Grove, or South Elgin.  The right person for the right job is really up to you.  Just make sure you are comparing apples to apples. If you have one estimate that includes paint and the other does not, or if one person is quoting dutch boy and another is using Sherwin Willaims Emerald paint- there will be a difference in cost.

How should I pick a Painter?

I am speaking on behalf of D’franco Painting & Wallpaper, and what my wife looks for when we have to hire a contractor for our home.

Do they have a website, google reviews or referrals from the local paint stores? How long they have been in business? How much experience do they have? Most importantly – do I trust them?

Are you covered? We have to carry several types of insurance to protect our employees, our company and you the customer. In Illinois, some of these insurances can be expensive. Workman’s comp for example- if someone is hurt- who pays for that injury of it takes place at your home? Other trades need to be licensed – painters right now do not.

How much experience do they have? We pride ourselves in experience and our online reviews.  We want you to know how many times we have done a project. All you have to do is check out our Facebook, Instagram, YouTube and of course our website.

Do they have their information on their vehicle when they show up? Most of Our work vehicles have our logos, and company information. I like to see when people show up, they take pride in who they are as a business. It helps to establish trust as well, as you know who is in your driveway or parking in front of your house. Your neighbors can relax knowing who or what the car is in your driveway or in front of their house as to who is parking out front. (We do however use Subcontracotrs, that you can see on our team member page.)

Best ways to search for Paint Contractors?

Obviously, google is the top of the list but there are other ways to find good, reputable, and quality people. Don’t limit yourself when the “best painter near me” is not actually right in your home town. Good contractors travel. Google also varies search results so a top ranked contracotr may not sho wup today but will in 1 hour. Do they have google verified? That is another great thing to search for.

  • Have you asked your local paint store, or a few in the area? I usually ask 3 people
  • Ask people you know, work with or family
  • I have called people from the number on a work vehicle before
  • There are a lot of people using Facebook as well

Ready to get your house painted?

I hope this article helped. There are a lot of really great contractors and people to help you with your home. I hope we can be one of them, but I also know we may not be the best fit for everyone. We are here to help. If you need a good contractor- give us a call we will see if we have someone we know will help.

When the time comes for wallpaper, cabinet painting, or traditional painting, we hope we can Help. We serve the greater Chicago area and NW Suburbs including Hamshire, Huntley, Carpentersville, St. Charles, or other surrounding suburbs.  Give us phone call or text to help you love the space you are in.

Painting Exposed basement ceiling and concrete walls- Algonquin, IL

You have a basement. Your basement has an exposed ceiling of wood rafters and metal duct work. The basement also has unfinished walls of bare concrete. If you are ready like this customer to update the look and feel of your basement with out spending a ton of money on construction here is an option for you. Painting Exposed Ceilings and Painting concrete Walls!

Hello Everyone- David Cook with Dfranco Painting and Wallpaper here in Huntley, IL. Last weeks we painted our 4th basement ceiling for 2024! Painting your Exposed Basement Ceiling Black continues to be popular. This time we took a different step by painting the concrete walls white! Many of the homes we serve in the Chicagoland North West Suburbs such as Crystal Lake, Elgin, Gilberts, Pingree Grove and South Elgin have similar building materials so we can help you with something similar!

Issues with painting exposed ceilings

Depending on the age and materials used to build the house you can have several issues to deal with before painting your exposed ceiling.

  • Cleaning dust, dirt, cobwebs,
  • if you have a basement full of stuff- your gonna need to move it out of the area being painted
  • you will have to cover water pipes with insulation
  • new HVAC vents will need to be cleaned before painting
  • IF you have alot of loose wires, cables etc- the more that is cleaned up neatly the better things look when they are painted black
You are going to have to mask and cover everything before you begin

What color can I paint my exposed ceiling

Right now black is popular. In using a stock black product such as Black Aqualock Primer, or Black dryfall you gain an advantage in 100% coverage as there is no tinted, it is pre colored – HUGE difference for coverage.

Aqua Lock Primer stock black

But you are not limited to just black – with solid body primers you can pick pretty much any color you want! I cant wait to paint a fun color or white!

A picture is worth 1,000 words….

Painting concrete walls in your basement

So again we painted the walls in this basement as well! We had to do a quick clean of the dust, but overall walls were clean and ready to paint.

After masking the walls, we used a mason primer to go over the concrete- yes you have to prime concrete before painting it. Once the mason primer is dry then you can pick what ever paint or color you want and paint it white!

How much does it cost to paint wood rafters in my basement

The biggest issues with painting these areas is prep work. The more stuff you have in the basement the harder it is for us to prep and cover, which means more money. So please keep in mind that prep work will affect final cost. On average the cost to spray paint an exposed ceiling will cost from $2.50 to $4.00 per foot.

We hope this helps give you an idea of ways you can improve your home with paint. Painting Exposed Ceilings and concrete walls is an affordable way to get big lift for your home.

It doesn’t matter what your painting in your home, we can help. Give us call and let us know what we can do to help you love the space your in with painting, wallpaper, cabinet refinishinng- and exterior painting as well!!

Wallpapered Stairwells in Elgin, IL

Wallpaper, Wallpaper, Wallpaper! Is it cooming back, Do people still use Wallpaper, IS wallpaper even a thing? Yes to all. Today we share a a recent installation we Wallpapered Stairwells in Elgin, IL.

Hey Everyone, David With Dfranco Wallpaper, here in Huntley, IL. Today’s post is also in response to a question “Can you install wallpaper in my Stairwell?” Yes we can! It doesn’t have to be just in Elgin, as serve our surrounding areas of Algonquin, St. Charles, Barrington and Schaumburg to name a few.

Where to begin to Wallpaper a stairwell?

For this Wallpaper job in Elgin, the customer made it easy for us. The customer had already removed previous wallpaper from the walls. We had to do some repairs to the old plaster but in general it was pretty easy for us.

The walls were pole sanded, wiped down and then Primed with Roman 977 white primer.

The hardest part is always wallpaper selection. We had our customer go to JC licht in Geneva, and the had Renae help them with their paper selction. Once they selceted the paper we came out to engineeer the walls for how much paper they needed to order

How do I know how much wallpaper to order?

This is a loaded question! Wallpaper is tricky to order as each paper is unique. Each company can print the colors, widths, lenghts, type of materials as they see fit. There are no set standards with wallppaer printing. I call it the WA WA West of paper. Anything goes.

So for us to know how much wallpaper to order, we will measure each wall. We then need the wallpaper information:

  • How long is each roll
  • the Width of each roll
  • If there is a pattern repeat for the wallpaper
  • type of paper it is printed on
  • special instructions for booking time and adhesive used
  • pattern number

With this information, we determine:

  • how many strips/panels are needed by the width of the paper.
  • based on the height of each panel we determine how long each piece needs to be
  • we add for the sixe of the repeat pattern and find how long each panel must be with the over laps for the patterns. A 24 in pattern repeat will in affect means that 24 in of every piece is trash.
  • we determine how many panels we can get per roll
  • then provide how many rolls you need

How long does it take to install wallpaper in a stairwell?

When we are installing wallpaper in stairwells, the time to install can vary. When we Wallpapered Stairwell in Elgin, The overall time to install depends on the height of the staircase, the dry time of the paper play a roll in the time needed. Additionally if we have to trim the the paper before install, or if we have to allow longer booking times it will affect the time needed to install wallpaper.

In the staircase from the photos in this post, it was 1 man for 2.5 days.

How much will it cost to wallpaper a stairwell?

This is another tricky question as it depends on the paper you select, the prep work needed, and the height of the staircase, to name a few items. In a ideal world, yuo can figure at least $650.00 for a smaller area.

The project above had 8 hours of plaster repairs, we painted trim, ceilings, and primed walls, then installed, and we were over $2,000.00. (plus the cost of the wallpaper)

Best Ceiling Paint -Elgin, IL

Every area of the county can be unique when it comes to wall finishes. Some areas are smooth, there are textures and popcorn ceilings. Selecting the Best paint for Ceilings is a matter of matching the paint properties to the type of ceiling and the effect you desire. For this article, we are gonna assume you have smooth flat drywall ceilings.

Hello Everyone, David With Dfranco Painitng, here in Huntley,IL. This wekes question is about what paint should I use for my ceilings. SO- Here’s a comprehensive guide to help you make the best choice:

D'franco finishes chicagoland painting for realtors
flat paint on ceilings

What sheen should I use to paint my ceilings?

Most Designers, Painters, Builders, Paint store Reps, and indusrty experts will agree that flat latex paint is the Best paint for painting the ceilings in your home (in general). Yes there are exeptions which I’ll get to in a bit, but a non-reflective finish is preferred in almost all situtations.

Again, we are writng this for homes in around the Pingree grove, Algonquin, Carpentersville, Elgin, St. Charles areas of Chicagoland as they are alll pretty much the same.

Why should I use Flat Paint for ceilings?

We could send a ton of time on this, but at the end of the day, for your interior painting, you want a flat paint to be applied to your ceilings because:

  • it hides issues such as imperfections of the drywall
  • there will be minimun glare or reflection
  • there will be no shine- flat paints in general are the most accurate depiction of the color selected
  • flat paint is easy to touch up- if you have water damage, lighting replaced you will apprecaite touching up a ceiling vs reppainting the whole thing

Types of paint to use for Ceilings

There are several brands of paint- how to choose? Here is a list of ceiling paints we have used, and what we like or dislike about them that is best for interior painting in your home. (paints do change over time, so asa of this article post this is what we like best)

  1. Benjamin Moore Waterborne Ceiling Paint – This product is specifically formulated for ceilings and features an ultra-matte finish. It’s known for its slow drying time, which reduces spatter, and its ability to conceal blemishes well​​. We have found that it leaves marks, and didnt really touch up that well, (an electrician added a light, we touch up around it and it left a sheen different from the paintinng we did the previou day) It is also the most exensive.
  2. Harmony Interior Acrylic Latex – If you’re looking for an eco-friendly option, Harmony is UL Greenguard Indoor Air Quality and Gold certified. It includes mold and mildew inhibitors and is particularly effective for kitchen ceilings where you might encounter smoke stains or cooking odors​​. We used this product in a day care, funeral home and senior care facility. We had no issues with it, seemed ok- we only used it because thaat was what we were told to use.
  3. BEHR Ultra Pure – Home Depot says, “this paint is versatile for various ceiling textures, offers stain-blocking capabilities, and is low-odor, though it may require more than one coat for optimal coverage​​”. We say NOT. Great marketing, poor deliverance- from our experience. I thought price was high, and as you can see in this video- I would not call this a flat paint.

4. Sherwin Williams Eminence Ceiling Paint

This paint is newer to the market. We have only used it twice and that was due to the color selected. The can said that “This paint has no sheen and is a true flat”, and overall i think it was. Since it comes in a base color of Bright White, it an excellent choice for bright whites competeting with Behr.

OUR Top pick for Ceiling Paint- Sherwin Williams CHB

This paint is a powerhouse and workhorse. If your in the Chicago market your painters will know it well. It is said to outsell all their other paints. We have been using it since 2005. It has never changed, (that we have seen) the label is the same, smells the same, and works the same. In fact!.. we have gone back to do touch ups on ceilings 5 yrs later! We used the same paint, with a new gallon and you could not see where it was re painted! The Cost is amazing. We personally will only use this stuff unless told otherwise- it is that good. So hands down we feel that is is the BEST Inteior PAINT FOR CEILINGS

Good runner up- JC LICHT MHB ceiling paint. This product is meant to compete with Sherwin Williams CHB. We have used it once, and that was over 8 years ago, so I cant really give much information about it, except to say it is an option.

What is the difference between flat and other sheen levels

Sheen Levels determined how much shine or refelction a paint has. Flat paints, such as the ones mentioned, have the lowest sheen level. Which why it is ideal for ceilings as they diffuse light and reduce reflections. This quality makes imperfections less noticeable.

For wallls we tell people to use a low sheen/matte/ or eggshell. Sheen levels can get confusing!! It can drive us mad as well. Each paint line from each brand has their own sheen level, whichmakes it hard to match paint or do touch ups. The added tint also affects sheen, but alll lof these issues are best for another day.

Where can I look at the Flat paint types or sheen?

Images of Flat Paint Brands– For visual reference, images can be very helpful. However, for specific images of flat paint brands mentioned, it would be best to visit the manufacturers’ website. Maybe stop in at a home improvement store to see the color swatches and finishes. On line or digital images may not always accurately reflect the true colors. Which is also true of different cell phone cameras and image viewers.

When considering paint for your ceiling, remember to take into account the color and finish. Then the paint’s ability to cover imperfections, its resistance to mold and mildew, and the room’s specific conditions and usage. This will ensure you choose a paint that is both aesthetically pleasing and long-lasting.

How to Remove Commercial Wallpaper

Remove Commercial Wallpaper at my Office!

Hello Chicagoland!! David Cook with Dfranco Painitng and Wallpaper in Huntley with today’s question!

If are in the midwest, especially in the Schaumburg, Elgin, Wheaton Suburb area, and been to your doctor’s office, dentist office, or hotels, you have seen commercial wallpaper. Most of the commercial wallpaper you see on walls is meant for a 15-25 year life span. But what if you don’t want it on your walls?  If you want to know how to remove the commercial wallpaper where you work, then read on because this post is for you.

Can I just paint over the wallpaper?

How to Remove Commercial Wallpaper - paint over wallpaper

This question is one of the most popular questions we receive. The answer is…maybe.  If you have wallpaper that is installed, usually in your home, that is smooth, and won’t easily come off the wall, then the answer can be a yes. However, the wallpaper that is on walls in hotels or offices is commercial grade wallpaper. What does that mean?

  • This wallpaper is very heavy duty-a very thick material.
  • The wallpaper itself has a texture, usually very course.
  • It is not a very good surface to paint over because it is made of vinyl or other materials that are not intended to be painted over.
  • Commercial wallpaper is intended to be left on the wall until it gets removed.

For wallpaper you have that can be painted over, you can check out a bog post we did about this some time ago:

Can I remove commercial wallpaper myself?

I will not say that you should not remove the wallpaper yourself, you certainly can try to do it. I would recommend that you call a contractor that has experience in removing commercial wallpaper for several reasons:

  • Commercial wallcovering is heavy.
  • The wallpaper itself is 54 inches wide- awkward to work with.
  • Fire alarms, light fixtures, etc. have been installed over the wallpaper itself, so they need to be removed first.
  • Due to the size and weight, you will need a dumpster to dispose of it.
  • Adhesive removal can be tedious but it is also MESSY!

If you want to tackle this job yourself, you will need some tools.

  • Pump sprayer
  • Garbage cans
  • Screwdrivers
  • Gloves
  • Drywall knives (used to apply drywall compound) a 4′” or 6″ blade is perfect
  • Drop cloths
  • Buckets
  • Sponges
  • Access to hot water
  • A vacuum
  • Razor blades and a blade holder or utility knife

Let’s remove some wallpaper!

Make sure you remove all outlet covers, lights, pictures, etc. from the walls, and put them in a safe place.

Lay out your drop cloths on the floor. There will be dust from the dried glue coming off the wall. Have a plan where you will dispose of the old wallpaper.

Are there baseboards that will be coming off too? If so, just peel them from the wall. If not, then you will have to use a razor blade or sharp razor knife to cut along the edge of the baseboards before you remove wallpaper.

Start from the bottom of the wall, use the drywall knife and start to peel the paper from the wall. Because how heavy and durable this wallpaper is, it should come off in full-size sheets (54 inches wide by the height of your walls) you may need 2 people.

IF YOU SEE MOLD BEHIND THE WALLPAPER…STOP! Call a professional to come out. 

Hopefully, the walls were prepared from the previous install and when you remove the paper, the wall is not damaged (we are assuming that for this blog). The glue that remains is very hard. To remove it, get your pump sprayer filled with hot water. Now just spray the walls with hot water. LET THE WATER SIT! It needs time to reactivate the glue. Once the glue is soft, scrape the glue from the walls and throw it in trash bags-NOT down the toilet.  Once you have scraped away as much glue as possible, use a sponge with hot water and wash the walls clean.

After the walls are dry they are ready to paint or install new wallpaper.

If I don’t want to do this myself…

The next most popular question is, “How much will it cost to remove commercial wallpaper?” Our cost to remove is about $0.98 cents per SF. If you read the above, there is a lot of work for commercial wallpaper removal. Our cost includes:

  • Setup and cleanup of walls.
  • Actual removal of wallpaper from walls.
  • Removing all glue from walls.
  • Washing wallpaper paste residue from walls.
  • Minor wall repairs. If the walls have been severely damaged, we will have to evaluate the damage to give you a cost to repair.
  • Disposal of the old wallpaper.

There are always other issues that can affect the cost, such as 2-story walls or mold or water issues. Have questions? As always, you can call us at any time at (847) 349-4112 to get a free estimate for these services.

With wallpaper services for your home and office, we are here to help you love the space you’re in.

How long after painting a bathroom can I shower?

Hello everyone, David Cook with Dfranco Painting and Wallpaper here in Huntley, IL, with today’s you ask we answer – How Long after painting a bathroom can I shower? When we paint a bathroom, this is the top asked question, and most ignored answer.

Making sure the paint cures ensures a successful paint job, so lets dive into today’s question.

How long does it take to paint to dry to the touch?

When you are painting your home, and we are assuming interior painting for the purpose of this blog post, wet paint is never fun to work around. Each paint has its unique properties so you do need to check the lable to make sure you follow their specs- so you dont void the warranty.

new bath paint-make sure its dry before showering

Typically- dry to the touch is a few hours. It can be sped up by using a fan. Keep in mind dry to the touch does not mean cure time- huge difference- see below..

When will the paint be fully cured?

So- great question! The dry time is the touch. The cure time is when it is 100% dry, no more off gassing, can be put to its full use (ie washing)

The cure time is when all of the solids in the paint have fully dried. These solids are in part the tint, the main chemicals that make the paint what it is. They are fluid when applied and need time to dry together to get its full bond, water resistance, UV resistance, etc.

Typically, cure time is 30-45 days. Ok- but How long after painting a bathroom can I shower? You can use it in 24-36 hours, but make sure you avoid excessive moisture by keeping doors open, vents on etc, the last thing you want to see is moisture drips.

Tips to keep paint looking new in bath after painting

Everyone is anxious to start decorating after the paint is up and dry to the touch. But be careful! We have already answer How long to after painting a bathroom can I take a shower is 24-36 hours. The same rule should apply before hanging shower curtains, glueing mirrors, towel holders etc.

Whenever you take a shower- you should always have ventilation. That can be achieved with open windows, open doors and if you have one- using a vent fan.

If you have something on the wall- toothpaste, hairspray, dust, make sure to use care to clean it! We say to use microfibre and water- gently to clean- the more you wipe the higher your chances to make marks on the walls.

Other issues with paint in bathrooms

The number one problem is moisture. Water from showers, dripping from the sides or puddling where the water seaps into the drywall are the biggest issues we are called to fix.

Seap lines- looks like the walls are crying-

running lines on bath paint
running, seaping or crying walls in a bathroom

These typically are due to poor paint quality and or no ventilation while using very hot and steamy showers. Ventilation takes care of most of this- usually.

Have other Paint questions!

Let us know- we are here to try and help you love the space you’re in and take the pain out of painting!

Paint your basement Ceiling Black!

So you’re thinking of what to do for your basement ceiling. Should you drywall, or maybe just hang a drop ceiling? Then someone told you; Paint your Ceiling Black! Now your thinking.. should I – could I- Would I dare- we say yes you should!

Hello Everyone- today’s question- Paint your Basement Ceiling Black is a hot topic for 2024 for us. We have done 4 of these projects now -and so far each time looks just as good as the last. The latest project comes from Gilberts, IL.

What you need before basement rafters black

You can see from the images here and the video above, the difference from wood to black is huge!

There area a few things to keep in mind..

  • this is done by spraying- so there can be a mess to maek this happen
  • if you have a basement full of stuff- your gonna need to move it out of the area being painted
  • you will have to cover water pipes with insulation
  • new HVAC vents will need to be cleaned before painting
  • IF you have alot of loose wires, cables etc- the more that is cleaned up neatly the better things look when they are painted black
basement ceiling ready to paint black

What kind of paint should I use too paint my ceiling black

There are two main type of black paint we have used to paint ceilings. The first is a commercial product, and it is called Black Dryfall. The 2nd is black aqualock primer.

Dryfall is typically used in commercial spaces. It is quite unique. You need to have some open spaces- 14 ft tall or higher for the product to really work its magic. At 14 feet, the product has enough air when falling that it dries out becoming dust! You then sweep it up!

Black Aqualock Primer, is stock black, not tinted- HUGE difference for coverage. When black is tinted it does not cover as well as a pre made black product.

Aqua Lock Primer stock black

Before and after Black painted ceiling

A picture is worth 1,000 words….

How can we help you paint your basement?

it doesn’t matter if what your painting in your home, we can help. Give us call and let us know what we can do to help you love the space your in with painting, wallpaper, cabinet refinishinng- and exterior painting as well!!

Levels of Wall Prep Before Painting

So you have a place your living or working that you are looking to have painted. Your not sure what to expect for what gets fixed or not. There are nail holes in your walls, cracks in the walls and areas that look aweful. How much repair do you want, should you have done. Today we look at Levels of wall prep before painting!

hello Everyone.. David here at Dfranco Painting and Wallpaper in Huntley, IL, and today we talk about wall prep before painting. This is a common and recurring issue that happens while painting homes. Lets see if we can help with this issue!

What is wall prep?

When any surface is going to be painted, there is a level of prep work that needs to be taken. If you are painting a canvas- it may need primer, a base coat or paint and the area around you covered. Painting the exterior of a home need repairs, power washing. Painting the interior of a home means that you need to get those walls ready for paint!

Walls- especially those made with drywall are going to have dents, nics, scrapes, holes, cracks or dirt on them. These issues need to be fixed! To what level you are going to fix is what we are getting into today. If you really want to get into this.. take some time to review Paint Contractors Association in-depth definitions here

Level 1 Standard wall prep

So we are going to review the Levels of wall prep before painting, as described by Dfranco Paintin, and what is in our estimate or scope of work.

Standard Prep-included in basic painting package

WALLS & CEILINGS:
• Cleaning of surfaces (wiping off excessive dust), to create optimal adhesion
• Filling and sanding of any minor knicks, nail holes, or other noticeable imperfections that are smaller than a 1/8 of an inch . (example: nail holes, minor scratches from hands/paws) This process is about 15 min.
• Walls are pole sanded
• Spot-priming of drywall patches
• Taping off and covering items when necessary

small hole repairs are part of basic wall prep included in our standard pricing

TRIMWORK:
• Filling/sanding minor imperfections with woodfiller, or wood putty is not part of the basic pep or repairs
• Caulking open cracks where work is being done, with the excpetion of when staining and/or varnishing. These cracks will most-likely not be flush with the substrate. The purpose is to fill gaps.
• Spot-priming any bare wood areas
• Taping off and covering items when necessary

Intermediate wall prep -Level 2

Level 2 Prep- this is time and material based

WALLS & CEILINGS:
• Standard Prep Included
• Filling & sanding of larger holes (sizes ranging from a quarter dollar to a baseball), excessive nail pops, excessive scratch marks
• Minor repairs onn corner bead, seams etc
• Rough guess is 90 minutes to 2 hours for these type os repairs..

this is a repair that is time and material based

TRIMWORK:
• Standard Prep Included
• Filling minor holes and imperfections with wood filler or wood bondo to create a flush profile with the substrate
• Light sanding with only sanding blocks and paper to all trimwork to create a uniform texture (however, the build-up of previous paint creates ridges too thick to make the profile uniformly smooth, in which case, you will still see the profile of where the old paint meets bare wood or less paint, but the overall texture should be uniform)
• All joint cracks to be caulked

Level 3 – High level wall repairs

WALLS & CEILINGS:
• Standard Prep & Level 2 Prep Included
• Corner bead and inside seam/drywall seam replacement
• Minor skim coating and sanding of uneven areas or uneven profiles
• Fairly labor-intensive figure at least 4-6 hours..

drywall seams and corner bead to be repaired

TRIMWORK:
• Standard Prep & Level 2 Prep Included
• Power sanding the trim to create a uniform profile if needed
• Using bondo to fill minor imperfections – imperfections should end up almost invisible
• Using Bondo to skim over larger profile diferences to create a uniform and smooth profile

Other wall prep Questions?

Im sure you might, but this should get you started.. If you do have other questions.. let us know!

Book Your FREE Estimate
MM slash DD slash YYYY
This field is for validation purposes and should be left unchanged.
close

Your Free Estimate

To help home and businesses owners during this challenging time, we are offering free virtual estimates.

Fill out the form below and we will schedule a time for a free video call estimate.